Level Book in Excel by the Height of Instrument Method: Levels, Arithmetic Check and Misclosure Adjustment
- XLSX
- 13 KB
- Version 1.0
- English
- October 23, 2026
Ready to download
Editable Excel file
This sheet is also available in: العربية
Levelling is the measurement of level differences between points with a level and a staff, and it is the most accurate and cheapest way to carry levels on a site. But a paper level book is full of chances for error: a wrong sum, an intermediate reading entered in the foresight column, or forgetting to update the instrument height at a change point.
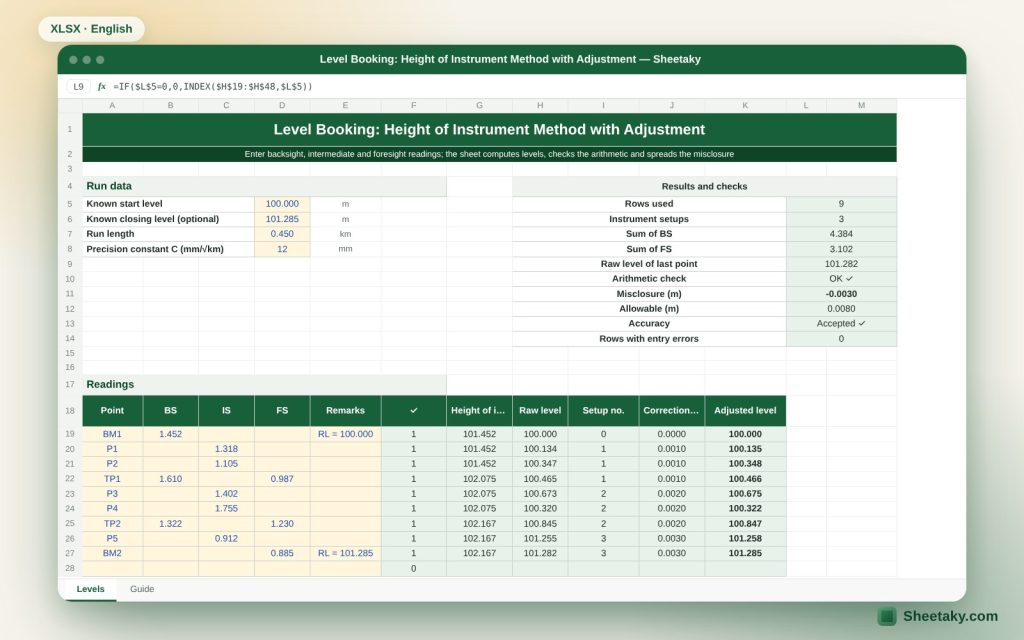
This sheet turns the book into a smart table. You enter readings as you read them in the field in the backsight BS, intermediate IS and foresight FS columns, and it works out the instrument height at each setup and the level of every point, checks arithmetically that the sum of backsights − the sum of foresights = the difference between first and last level, then compares the misclosure with the allowable (C × √K) and spreads it over the levels by instrument setup number.
Who is it for?
- Surveyors and site engineers doing levelling
- Road and sewer engineers
- Surveying students in universities and institutes
- Contractors carrying levels to floors and structures
What is inside the sheet?
- Thirty rows for readings with a check mark for each row
- Height of instrument HI, raw level and setup number
- ΣBS, ΣFS and the arithmetic check
- Misclosure, allowable and accuracy status
- Correction and adjusted level for each point
- Highlighting of wrong rows and a guide sheet
How to use it
- Enter the known start level, the known closing level if any, and the run length in km.
- In the first row enter the start point name and the backsight on it.
- For each intermediate point enter only the intermediate reading IS. For each change point enter the foresight FS and the new backsight BS in the same row.
- The last row carries the foresight on the closing point.
- Review the arithmetic check and then the misclosure, and take the adjusted levels from the last column.
Formulas used
Height of instrument HI = level + backsight readingPoint level = HI − reading (intermediate or foresight)Arithmetic check: ΣBS − ΣFS = last level − first levelMisclosure = computed level of the last point − known levelAllowable = C × √K mm (K in km)Point correction = −error × setup number ÷ number of setups
Worked example from the sheet itself
The example: known level of BM1 100.000 m, closing on BM2 with a known level of 101.285 m, a run length of 0.45 km and three instrument setups.
- First instrument height = 100.000 + 1.452 = 101.452. The level of P2 = 101.452 − 1.105 = 100.347.
- ΣBS = 4.384 and ΣFS = 3.102, and the difference 1.282 equals 101.282 − 100.000: the arithmetic check is good.
- The raw level of BM2 = 101.282, so the misclosure is −0.003 m against an allowable of 12 × √0.45 = 8.05 mm: accepted. The final adjusted level of BM2 = 101.285 m.
Height of instrument versus rise and fall
In the height of instrument method we compute the level of the line of sight at each setup and subtract each point’s reading from it. It is faster and easier when there are many intermediate points because each point needs one subtraction only. In the rise and fall method we compute the difference between each two successive readings and accumulate it; it is longer but exposes errors in intermediate readings because every reading enters the computation twice.
The sheet checks the arithmetic of the height of instrument method with the basic condition: ΣBS − ΣFS = difference between the first and last level. This check verifies computation only and does not reveal errors in intermediate readings (they do not enter it), so do not rely on it alone for precise work.
Common level book mistakes
- Entering an intermediate reading in the foresight column, which changes the instrument height and spoils everything after. The sheet highlights a row with more than one intermediate or foresight reading together.
- Not recording a backsight in the first row. The sheet requires it because the instrument height starts from it.
- Carrying a wrong level at a change point (forgetting the new row’s instrument height).
- Reading the staff upside down or from the wrong line.
- Not holding the staff plumb, which increases the reading instead of correcting it.
Sources of levelling error and how to reduce them
Instrument errors: the line of sight not being horizontal (collimation error), whose effect is reduced by balancing backsight and foresight distances at each setup. Curvature and refraction errors: also reduced by equal distances and by not sighting close to the ground in heat. Staff errors: not plumb, wear or a missing base, reduced by using a staff bubble and swapping between two staffs.
Personal errors: a wrong reading or a wrong booking, reduced by the observer calling the reading back to the booker and both estimating the reading roughly before booking.
Acceptable accuracy limits
A constant C between 5 and 12 mm per root kilometre is usually used according to the order of levelling: 12 mm/√km for ordinary levelling in engineering work and smaller values for precise levelling. Use what your project specification or the approved survey manual states.
For a 0.45 km run and a constant of 12 the allowable is about 8 mm. If your misclosure is 3 mm the run is excellent, and if it is 15 mm you must re-measure rather than distribute the error.
How the error is distributed and why by setups
Levelling error accumulates at each instrument setup, so the sheet distributes the correction in proportion to the setup number from which the point was observed: points of the first setup take a small part, and points of the last setup, led by the closing point, take the whole error. This is the usual method when setup distances are roughly equal; if they differ a lot, distributing by distance travelled is more accurate.
If you have no known closing level, leave the cell blank and the sheet shows raw levels with no correction, and the arithmetic check still applies.
Field tips
- Place the instrument midway between the two staffs when possible.
- Start and finish on two known fixed points (BM) and tie the run between them.
- Keep each sight between 30 and 60 metres according to the instrument and conditions.
- Observe before the intense heat and avoid midday over open ground.
- Re-read the staff at any doubt before moving the instrument.
- Keep your original book for review after transferring to the sheet.
Tips for best results
- Record a remark for each point (such as “kerb” or “house corner”) to help identify it later.
- Do not move the instrument before confirming the last foresight on the change point.
- If a row turns red read the rule: a change-point row carries FS and BS together, and an intermediate carries IS only.
Frequently asked questions
Does it work for an open run?
Yes, leave the closing level blank and you get raw levels with the arithmetic check and no adjustment.
How many points?
Thirty rows in this version.
Why does the sheet not use rise and fall?
This version uses height of instrument because it is the most used on site. The results are mathematically identical for the same readings.
How do I handle two consecutive change points?
Write each in its own row, with the foresight and the new backsight in the same row as in the examples.
Download the sheet
Press the download button at the top of the page to get the Excel file. It includes a full guide sheet, yellow input cells and formulas protected from accidental edits. The sheet is also available in Arabic from the language switcher.
The sheet is a calculation aid. The acceptable accuracy limits are set by your project specification.
Related sheets
Land surveying
Level Run Adjustment in Excel: Misclosure, Allowable Error and Correction
An Excel sheet for a level book between two benchmarks of known level: it computes levels by the…
Land surveying
Vertical Curve Table in Excel: Design Levels, High Point and K-Value Check
An Excel sheet for designing a parabolic vertical curve between two grades: it gives a level table at…
Land surveying
Irregular Plot Area from Coordinates in Excel: Area, Perimeter and Bearings
An Excel sheet that computes the area and perimeter of an irregular plot from its corner coordinates, with…